SONG DA HYUN
Assassin's Creed Resistance (Fan Made Trailer)
This project was created with: UE5, Maya, Zbrush, Substance Painter, Marvelous Designer and Photoshop
0. Storyboard
Since I planned a cinematic trailer video, I considered describing the theme and story into the video in a subtle way. I believe that one of the most important events in French history during World War II is the Liberation of Paris(1944), and it was evident that the French resistance played a significant role in the event. Therefore, I divided the story into two main parts.

The first part of the story depicts France under German occupation, while the second part portrays France after liberation. I decided to represent these scenes showing an Assassin character symbolizing the French resistance tearing down a flag representing the Nazis, and connect the scene into after liberation, that people gathering around the Arc de Triomphe celebrating the Liberation of Paris.
Since the moment shifts when the main character who is both an assassin and the Resistance cuts down the Nazi flag marks, it was important to clearly distinguish this point. To achieve this, I added indoor broadcasting scene and street scene between before and after scene of liberation event. Furthermore, to contrast the atmosphere I differentiated the design and lighting of places.
Next, I will explain the sub-projects that make up my main project: Arc de Triomphe, Paris Apartment, Street of Paris, Place de l'Étoile and Character.
Ⅰ. Arc de Triomphe


The main asset of this video is the Arc de Triomphe in Paris. With so many decorative elements here, I was quite concerned about the work process. But since the Arc de Triomphe is made up of a single material, I could use my efforts to replicate the decorative elements exactly.
However, due to time constraints, I didn't have the luxury to create all the decorations manually. Therefore, I actively utilized normal maps to solve this problem. Since I'm very familiar with Photoshop, I used actual photos I took to generate alphas, and then added them to the height values in Substance Painter. Through this mechanism with Photoshop to Substance Painter, I could get the alpha transformed into a normal image for the final normal map.

And the most detailed and realistic modeling I put effort into on the Arc de Triomphe are these two sculptures called Departure of the Volunteers of 1792 and The Triumph of 1810. I selected these from the four sculptures decorating the Arc de Triomphe. Because their atmosphere aligned well with the storyboard.
The Departure of the Volunteers of 1792

This sculpture portrays the volunteers who rallied to aid France in resisting foreign incursions during the peak of the French Revolution in 1792.
Due to the large number of figures depicted in the sculptures, I rigged base meshes in Maya at first. Then I adjusted the poses and positions of the rigged meshes to match those of the sculptures. Subsequently, I imported the posed models into Zbrush and sculpted the muscles, clothing, and decorations directly to match the sculptures.
The Triumph of 1810

On the other hand, the Triumph of 1810, as the title suggests, is a sculpture depicting Napoleon's Triumph over Austria. Unlike The Departure of the Volunteers of 1792, the angel in this sculpture holds a trumpet instead of a sword and are depicted with a smiling expression on their face.
As each sculpture embodies images of struggle and victory respectively, I utilized them as part of the staging to reveal the contrast in atmosphere between pre-liberation and post-liberation.
Ⅱ. Paris Apartment

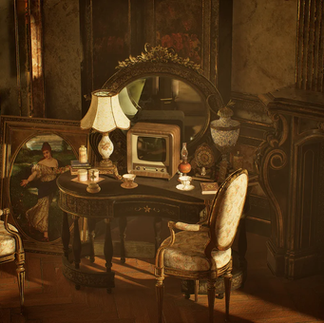
The Paris apartment serves as the sole indoor scene in this video. Simultaneously, this scene marks a crucial moment in the storyboard, presenting the pre- and post-liberation periods of Paris
In this scene the focal point was the TV broadcasting show about the liberation of Paris. So I first determined the design of the TV and collected references for other props in room and then crafted all assets.
The overall atmosphere of room was influenced by the Musée Nissim de Camondo in Paris where I had previously visited. However, consistency among the asset was a crucial task to maintain the coherence of the level, because overly extravagant elements could disrupt the harmony of the level.

Therefore, initially, I created separate base modeling for the furniture and ornament sets to adorn the furniture. As I aimed to create a Rococo-style room, I first crafted numerous ornaments featuring natural elements and curves. These ornament sets were then used to embellish the base furniture modeling.
Secondly, I focused on the consistency colors of furniture. I predetermined the colors to be used for texturing furniture and house modules and primarily adhered to those colors. In contrast to the dark lighting in previous scenes, I planned to maximize the indirect light intensity for bright lighting. So I chose for colors with moderate brightness levels on furniture. Apart from white, I predominantly used shades of red, green, and brown colors.
Unlike the flag of Arc de Triomphe which required special simulations, fabric creation for furniture was achieved using Marvelous Designer. As Marvelous Designer allows functions for direct manipulation of fabric to simulate its shape, it was useful for furniture production.

Table props set
Funiture set
Additional props
I aimed to show a wide variety of textures in this scene. I could achieved this by blending textures of wood, marble, metal, and fabric appropriately. Especially, I made effort to incorporate multiple materials into a single asset.
Ⅲ. Street of Paris


To efficiently depict the Parisian cityscape, I created house and street module sets with various props. Then I arranged them in Unreal Engine's level editor.
House module set


In this scene decals were really useful to decorate the ground. I used a bunch of decals from Quixel Megascan, and I also made a few in photoshop(especially decals on the walls).
Street prop set
I captured the object with a DSLR camera and meticulously removed shadows and distortions using Photoshop. If I intend to utilize the image as a tile map, I edit it into a seamless image. Subsequently, I used this image as the base color in Substance Painter. By incorporating normal, roughness, metal, and dirt textures tailored to the material, the final texturing process can be completed. Through this methodical approach, I was able to efficiently craft lifelike assets within a condensed timeframe.
Ⅳ. Place de L'Étoile

Since it wasn't feasible to create every building and props existing in Paris, it was a significant challenge to organize the level with limited resources in a harmonious way. Initially, I referenced Google Maps to compose the blocks where roads and houses around Place de l'Étoile would be placed.
I first placed the House Groups on the blocks, followed by the placement of trees. For the trees, I utilized the Megascan tree pack available on the Epic Store. Considering the temporal setting in August, I configured the trees with lush green foliage. Given the extensive size of the level, instead of individually placing trees, I created level instances by grouping multiple tree assets and diversified their placement across the level.

Street props located throughout the streets were also arranged in a similar manner. After creating level instances by combining various props, I positioned them throughout the areas surrounding Place de l'Étoile. With using level instances, I was able to construct such a large-scale with props in a short time.

Additionally, by incorporating Megascan sources, I was able to enhance the realism of the level even further.

Lighting
I happened to meet an elder who experienced the German occupation period in the Carcassonne of France. According to him, it was a time of hunger and fear for everyone. While having a conversation with him, He mentioned that his neighbors went to concentration camps, and most transactions for food and groceries were conducted using tickets. Hearing stories from someone who experienced that time firsthand greatly influenced the shaping of the atmosphere and lighting direction of this project.
Listening to the atmosphere I heard from the elder, I envisioned the moment just before dawn, when the sky turns red. I thought the combination of red and black colors in the sky could describe gloominess and unease over the time frame. Additionally, I used rising smoke throughout the city to convey the idea that Paris in the video is during war.

Furthermore, the scene that serves as the turning point between pre-liberation and post-liberation is the moment when the character tears down the German flag. With these shots, I wanted to capture the image of the symbol of occupation being completely destroyed, symbolizing the transition from occupation to liberation.

To convey the liberated atmosphere of post-liberation Paris, I used bright afternoon lighting which depicts escapes from dark oppression. To contrast with the static and dark pre-liberation scenes, I covered the Arc de Triomphe with lace decorations. I staged a bright and hopeful scene by adding numerous flowers decorating the Tomb of the Unknown Soldier which is a fireplace on the floor of the Arc de Triomphe with surrounding crowds. And I added celebration particles with nCloth and inserted them in the sky.
Since I used Unreal Engine to create this level, I was able to easily represent crowds using the foliage feature.
Ⅴ. Character


Lastly, I'd like to introduce the Assassin character. In Assassin Creed, the most significant elements symbolizing the Assassin are the hood and the hidden blade rather than the character's face. Keeping this in mind, I prioritized the creation of the costume and the hidden blade for the character. By concealing the character's face with a mask, I wanted to show the characteristics of the character through the clothes and props rather than the face of the character itself.
The reference I used mainly was Lydia Frye from Assassin's Creed Syndicate. The reason for this choice was that her khaki-colored outfit, which is a simple design for such characteristics, felt closest to the uniforms of World War II. As I enjoy making clothes for ball joint dolls, drawing patterns for the outfit was not difficult for me.
I devoted time to beautifully implementing the shape of the hood, considering it as a crucial aspect of the assassin's identity. Furthermore, to balance the monotony of the garment's color, I incorporated elaborate embroidery. The embroidery on the clothing was created by generating an alpha in Photoshop and then adding normal and height values in Substance Painter. As there weren't many decorative elements, I wanted to make all belts out of leather, aiming to create diversity by utilizing differences in brightness and roughness within shades of brown.

The costume modeling and simulation were done using Marvelous Designer, and textures were created by Photoshop and Substance Painter. Modeling was carried out in Maya. Additionally, animations were achieved by modifying basic characters and animations in Maya from Marvelous Designer and Mixamo.

The hidden blade is the primary weapon of the assassins. So I aimed to realistically depict worn leather and scratches on the metal for the blade. By engraving the Cross of Lorraine on a blade, which was used by the French Resistance as a symbol, I intended to signify that this hidden blade belonged to an assassin affiliated with the French Resistance.

Thank you for taking the time to do my work. I hope this project has been enjoyable and interesting for you as well;D


